


Whew! It has been a long, long time since I had time to write here. Anyway, I became more and more studious for the past few weeks, working on my thesis and other class work. One of those that kept me busiest was our printmaking class. We had the privilege to be mentored by Ms. Victoria Abano, who is the current president of the Philippines' only printmaker's official organization, the Philippine Association of Printmakers (PAP). For this semester, we are plowing through a repertoire of relief printing techniques. For this entry, I would like to show to you one of my first plate of prints: a rubbercut, or also known as linocut.
Ever since I saw Holbein and Durer’s woodcuts and engravings I became so curious as to how prints were made, especially how they finely cut the details on the plate (which I had a realization that it really needs a great skill to do that later on). Understandably, the prevalent methods used for them at that time would have been woodcutting or engraving. Woodcutting, as it involves subtracting material from the plate in order to create a raised image, belongs to relief printing, whereas engraving scratches the surface of the plate and involves the ink settling in those hollows is amongst the intaglio printing techniques. We tackled woodcutting already as of this time of writing, and I will reserve writing about it for later.


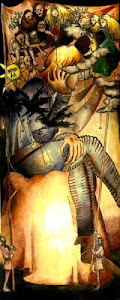
We used rubber sole (in substitute for linoleum) as the printing plate and a brayer or a rubber roller to spread the oil-based ink. Using some old woodcutting tools from my sister, I developed the image that I drew on it beforehand. It depicts a knight on a small boat, wandering in the vast land and staring at the sky. This design is quite random except from the fact that I have a fascination towards knights and armors so I leave you to your interpretations towards my design. The rubbercut is usually the first done by newbies since it is easy to cut and yields to most directions when helped with a newly-sharpened cutting tool.
Then I placed the paper gently and carefully on the plate. In theory, one can use any kind of paper for printing, but as a rule, it is advisable to work with absorbent and heavy papers (by weight, about 90 grams/meter to less than 200 gsm) that are able to take up ink very well and withstand the rubbing which transfers the ink to the paper. Usually, in class, we opt for medium-toothed watercolor papers, at about 110 gsm. This holds the ink well, while being thin enough that it isn't so tiring to rub in the ink from behind.

Using a wooden spoon, I pressed the paper on the plate with ink so that the ink transfers to the paper thoroughly. I sometimes check the design underneath if there is enough to transfer, or if I missed any spots during the rubbing.

When I am satisfied, I removed the paper gently from the plate in one careful movement.
The ink takes almost a day to dry so we leave it behind in a dry and well-ventilated place.

This is the most basic thing that one does with prints. I confess that the sense of accomplishment in making these prints is rewarding, but it gets tiring if you have to do ten exact prints. Unfortunately, that is the minimum requirement for this subject. Sometimes, it takes the amateur printer some twenty attempts or more to get ten right. I shall discuss the colored prints later on.
***
I also recently changed my thesis topic, which I told to you last time about family trees and kinships. I changed them to something clockwork and kinemats, which largely inspired bySharmanka and Cabaret.

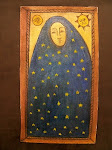
And I also recently received a wonderful gift from the Bunny. It is a painting of the Bunny and me in a strange forest, with a hut at the middle of it. It was painted by the wonderful artist and friend Rima Staines. Follow this link for further details.
